
You want to replace your kitchen sink faucet. You’re probably thinking about how much it’s going to cost and how long it’ll take to get the job done. It can be a daunting task, but replacing a kitchen sink faucet isn’t nearly as difficult as most people think. In this guide, we will go over in detail everything you need to know about removing and replacing a kitchen sink faucet. How to remove kitchen sink faucet.
Spray With Penetrating Oil

If you want to remove your sink, start by spraying a generous amount of penetrating oil onto the underside of the faucet. Let it sit for at least 15 minutes. This will help loosen up any corrosion on the faucet and make removing it much easier.
Turn Off the Water Flow In the Sink

Before you do anything else, turn off the water flow to the sink. You can usually find the water supply valve under the sink, or on the side of the sink.
Remove Kitchen Sink Supply Lines And Handles

To start, turn off the water supply to the sink and disconnect the hoses leading to it. Remove all of the fixtures that connect to the sink, including handles, faucet spouts, sprayers and any other pieces. As you remove these parts, be sure to note their orientation. The orientation will vary based on which type of faucet you have; get it right the first time so you don’t have to second guess yourself when you’re putting everything back together.
Remove Kitchen Sink Faucet Mounting Nuts
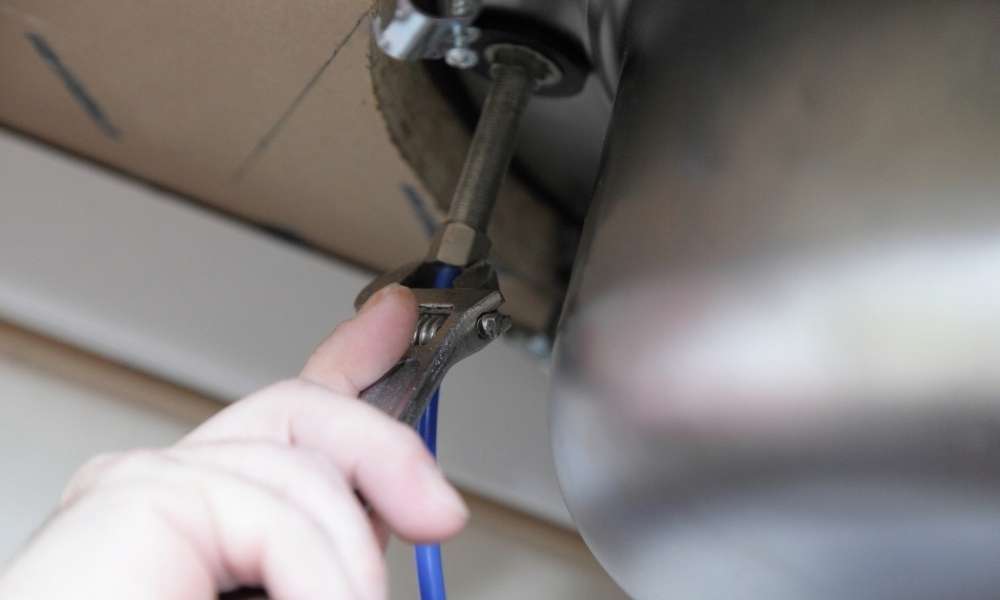
Remove Kitchen Sink Faucet. The first thing you need to do is remove the mounting nuts on your faucet. If you have a single-handle kitchen sink, you will have two nuts. One on either side of the faucet. If you have 3 handles, then one of the nuts will be in the center, and there will be one nut for each of the other two handles. You’ll need a basin wrench to unscrew these nuts and it might take some elbow grease to get them off.
Pull Faucet And Sprayer Up And Out

Remove Kitchen Sink Faucet. The first step is to remove the faucet and sprayer from the sink. There should be a retainer nut holding the sprayer hose in place, so you will need to loosen that. Once you loosen the nut, you can disconnect the two hoses and remove them from your sink.
Remove Kitchen Sink Faucet Residue
One of the first things you need to do is remove all the old pieces. There are a couple of items that need to come out before you can put in a new kitchen sink faucet. The stem and handle assembly, including any screws holding it in place. Then you need to get rid of any leftover sealant from where the faucet meets the countertop.
This can be done with a razor blade, we typically use one with a foam handle for this job. You’ll want to start by scraping off as much of the sealant as possible without cutting into the countertop surface then spray an adhesive remover over the area and let it sit for about five minutes. After that, scrape off any more sealant that’s left on top.
Clean Kitchen Sink Surface

The first thing you’ll want to do is remove everything from the kitchen sink. This includes any dishes, sponges, and food. Take an old rag and wipe down the entire surface of the sink.
Conclusion
The kitchen is the heart of the home, and the kitchen sink is the most used feature in this space. You want to make sure it is functional and easy to clean. If you’ve noticed that your faucet is leaking, or it’s starting to show signs of wear, or you just want to update your kitchen, then it’s time for a new kitchen sink faucet. If you are replacing your kitchen sink faucet, it’s important to know how to remove the old one first. This blog post will walk you through the process of removing a kitchen sink faucet.


